Craft Ideas: Nine Crafty things to take and do while camping

We try to squeeze in some camping over the summer months to get our fill of water time, marshmallow roasts, hiking and biking.  But there are also times when we just feel like hanging around the campsite enjoying the beautiful shade of the forest from our lawn chairs.  Quiet time at the campsite is a great time to pull out some activities for the kids, and we’ve got a few crafty ideas to recommend:

  1. Drawing Supplies – a sketch pad and pencil can lead to treasure maps drawn, stories written, leaf rubbings made, games played (such as tic-tac-toe) or, perhaps most obviously, inspired drawings
    Sketch Pad for Summer Drawing Outside newspaper pencils, earth friendly craft supplies, eco pencils, green pencils, HB pencils, school supplies
  2. Paints and brushes – gathered sticks and rocks can become art forms as they get a coating of bright paint from the kids.  Transform rocks into bugs or animals, and sticks can become wands.
  3. Wikki Stix – an easy portable activity, these wax covered strings can bend into any shape and can be used by themselves on a playboard, and could even be wrapped around a found rock or twig to give it a shock of colour
    Wax Stick Building Craft
  4. Collage Boards – our kids spent over an hour searching for just the right foliage to adorn their butterfly boards.   Also try sprinkling sections of sand on these for a beach activity
    Butterfly and rectangle collage boards
  5. Masking Tape or painters tape – mask out a giant x & O board in the dirt, and find some sticks to mark X & O.  Then ‘erase’ your game and start over again.  Or, make a nature walk bracelet by putting a piece of masking tape sticky-side-out around your wrist.  Collect little treasures such as leaves and twigs to add to your nature braclet
  6. Sunpaper – this is one of our favourites for summer, whether at home or out camping.  Find a pretty leaf or flower, add a ray of sun and a sprinkling of water, and watch these prints come to life.
    Nature Crafts - Sunprint Paper
  7. Fort building supplies – Clothes pins and string aren’t only for hanging laundry to dry!  A good nook of trees can be transformed into an uuber cool fort with the help of some towels or blanket secured with clothes pins on a line.
  8. Building supplies – we have a bin of building blocks that comes on every single camping trip and gets used on a blanket outside, or under cover if we’re hit with rain
  9. Leaf Press – collect samples of your favourite trees or flowers (if permitted by the park) and store them between the folds of this leaf press.  Patient campers will have pretty mementos to add to scrap books or to use with other craft projects.
    Camping Crafts - Leaf press

Read More

Craft Time Tips: Fun with the Kids Craft Club

Here are some simple tips to help your kids get started when they get their Kids Craft Club package in the mail!

  • Do a quick review of craft suggestions with your child, pointing out pictures and ideas.  This will often be a very QUICK review, as they may just want to get started right away!!
  • Note: the instructions are just guidelines that show suggestions for the craft supplies.  Your child may want to do something completely different, and that’s great!   
  • Let them open the craft supply package, and dump the contents onto workspace so that they can easily access supplies
  • Put a small amount of glue onto a plate or plastic lid, and let them use a sponge, paint brush, or craft stick for spreading glue
  • Let your child take the lead – kids are often more interested in process, rather than end product!
  • Be nearby, in case your child needs some help
  • Ask open ended questions about what they’re working on, such as “tell me about what you’re doing” or “that looks interesting”……they might want to share their thoughts on what they’re doing
  • Keep the conversation and their interest flowing by referring to the included ‘fun facts’ sheet and talking about their craft subject matter together

Read More

Craft Time Tips: How to make the most of craft time for kids

We recently received this question about time-crunched families and crafts, and thought it worth sharing!

Q. If my family only has time for crafts every so often, which crafts are most worth our time and why?

A. The best thing we can do as parents is to offer our kids a range of craft supplies, projects, and tools to explore.  Kids learn new skills and make new connections every time they have a new experience.  If you’re short on time, try to focus on a different activity every craft time.  For example, one week can be painting, another week can be beading, another week is drawing or modeling with clay.

If your child is confident with a particular activity, such as building or painting, make the supplies for that activity accessible, so that your child can work independently while you are focusing on other tasks.  A simple supply of scissors, paper, pencils, glue and crayons will be enough to get them started.

If your child is reluctant to do crafts on their own, encourage him or her by picking up on a theme they’re interested in.  Calendar themes are a common interest for every child, so take advantage by suggesting they make birthday cards or decorations for special events.  This way, you’ll save a trip to the store to buy a card or decorations.

Crafts don’t need to be complicated for kids to have fun with them.  Know your child’s interests and abilities, give them a few supplies and creative control, and watch them learn through hands-on fun!

Read More

Power Outage Activities: Ten Activities to do with the kids

The power was out at our house this morning, and it stayed that way for several hours.  Luckily it went out after I had heated food for the kids lunches, but I had to skip a few other daily-routine tasks, like drying my hair or boiling water in the (electric) kettle to make tea.  It got me thinking about the things we do during the day with our kids – some of which rely on power.  Here’s a list of power-free activities that you can do during an outage, or if you’re out camping or just want to go “old school” for a day.

1. Make some Music:

You can’t listen to music without power, so make some!! Practice singing, even if you’re tone-deaf.  The kids will be quick to join in.  Sing kid favourites or teach them some of your favourites.  Start harmonizing or sing in rounds – this can be really tricky for kids!  Our favourite is ‘Don’t Throw your Junk in My backyard – here’s a classroom full of kids doing a demo!  Or make a marching band with ‘instruments’ from pot lids, wooden spoons, and containers full of dried beans or rice.

2. Do Crafts:

Low-tech creative play that we (of course!!) love love love.  Pull out the glue, scissors, and craft supplies, and start creating.  Don’t forget to check the recycling bin for any hidden crafty gems!  If you want to work to a theme, ask kids to build a battery or generator that would give you power, or draw pictures of how power is made.  If they’re not interested or too young for that, do crafts that feed off of their current interests or calendar themes (such as winter or spring, for example)

3. Go Outside

Always a good alternative, whether the power is on or not.

4. Water Play

If your windows need cleaning or the floors need wiping, turn the kids onto the task!  They’ll be happy to help as long as it feels like part of a game.  And if everything is already scrubbed, then get paintbrushes out and put the kids to work with water on an old tile or chalkboard – they can make water patterns that dry quickly.  And of course they can extend the water play by having bath time – but remember that the heat won’t come on as long as the power is out, so they’ll need lots of snuggles to stay warm is their hair is wet afterwards!

5. Do A Play or Skit:

A happy alternative to watching TV is to create a drama (or comedy!) of your own.  Be inspired by ‘Jillian Jiggs and the Secret Surprise’, a wonderful book about Jillian putting on a show – it even has a fun script at the end!

6. Build a Fort:

In the living room, with blankets and chairs.  This would especially be fun in the dark!

7. Make Wall Shadows:

You might need to close the blinds during the day, but flashlights against a dark wall are always a favourite way to entertain!

8. Make Simple Snacks and Meals:

Cheese sandwiches without the grill, wraps, or anything you’d usually send in a bag lunch.  Snack can be apples spread with peanut butter and sprinkled with raisins.  Yum!

9. Build Something

Stack blocks or (non-breakable) cups.  Try making a tower out of paper (!?), make a marble maze out of toilet paper rolls, build a ‘sculpture’ from playdough, or use popsicle sticks to make a teepee frame or other structure.

10. Read a book, play a game, or do some sports

Anyday, anytime, anywhere.

Read More

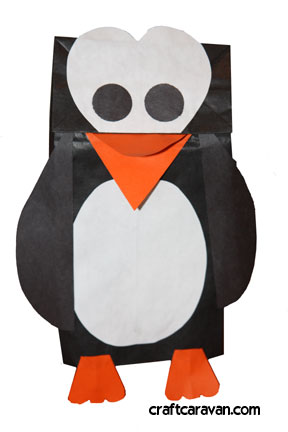
Winter Craft Theme – Penguin Paper Bag Puppet

Penguin Paper Bag Puppet

Supplies: black paper bag, orange, black, and white paper,  template for penguin paper bag puppet

Step 1: Print Penguin puppet template and trace the pieces onto coloured papers.  Use Black for the wings and inner eyes, white for the belly and eyes, and orange for the beak and feet

Step 2: Glue penguin belly to bag on the side where the flap opens.  Glue white eyes to flap.  Glue black eyeballs onto eyes.  Glue wings to either side of belly and glue feet.

Step 4: Make penguin beak:  Lift flap of bag and add glue to the underside of flap, on top and bottom.  Push folded end of penguin beak into glued area of flap and squeeze flap together so mouth is firmly pressed onto puppet.  Let your craft dry.

Read More

Copy Cat Crafts – Ladybug Paperweight

I came across this cute little ladybug in a home decor store, and she became inspiration for craft time with the kids:

ladybug craft for kids

We started by finding some smooth round rocks to turn into lady bugs.  We used red paint for one, and strips of tissue for the other.  This is our painted rock:

Paint rock red

Our decoupage rock is below.  To do this, rip tissue into strips.  Mix 2 parts glue with 1 part water and paint the glue onto the rock.  Press tissue onto the glue and then paint over everything with more glue.  Let dry.  TIP:  Let the kids do the tissue ripping!  It’s crinkly and loud – they love it!

  Rip pieces of red tissue    Decoupage rock with red tissue paper

Use black paint to add ladybug head and spots

paint black spots onto red ladybug

Finish your craft by adding eyes.  We used stickers on ours

Little ladybug and big ladybug

Read More

Five Reasons to Love the Kids Craft Club

Wondering abou the Kids Craft Club?  We’ve been sending craft packages to kids around North America (& the world!) since 2007!  Here are a few reasons why kids and their parents love the Kids Craft Club!

Why adults love the Kids Craft Club:

  • Time saver – no more scrambling for craft ideas and supplies; we send them
  • Boredom buster – crafts for a rainy day or quiet time with parent or caregiver
  • Fun learning – hands-on activities to develop creativity, critical thinking, fine motor skills
  • Eco-awareness – craft supplies are recyclable and made with recycled content where possible, and packaging is recyclable and biodegradable
  • Great Gift idea – a unique gift that keeps on giving every month!  Perfect for long distance family and friends.
Monthly craft packages sent to your door!

Why Kids Love the Kids Craft Club:

Kids Crafts in the mail every month
  • Guaranteed craft time –  just open the package and get crafty!
  • Exciting calendar based craft themes – new materials to explore every month
  • New discoveries – develop new skills and learn about each project theme
  • Fun Mail – who can say no to a bright green envelope with your name on it?

Read More

Kids Nature Crafts: Three crafty things to do with sticks

Fall winds mean leaves scattered on the ground, and along with the leaves comes an abundance of twigs and small sticks that kids can’t seem to resist picking up.  Our kids have a collection of sticks sitting in a bucket on our front door stoop.  We didn’t dare send the collection back to nature without telling the kids (after all, one person’s trash is another person’s treasure) but we felt confident that they’d be up for turning some of their sticks into fun craft projects.  We’ll happily let sticks into the house to be used in these fun nature crafts!

Kids Nature Crafts with Sticks 1 – Fall Leaves Tree: 

You’ll Need – a small dried branch (no leaves), tissue paper or bright coloured paper, scissors, glue

What to do:

Ensure that your branch is clean and dry.  There are two ways to make your branch into a bright tree for display.

fall leaves tree with tissue leaves First Method

Cut small rectangles of tissue paper – about 5cm x 3cm per piece.  Your child can take a piece of tissue, scrunch it up, dip one side in glue, and stick it onto the tree.  Alternately, he or she can dab a bit of glue onto the tree branch, and wrap the tissue onto the branch.  See our picture below.Second Method

Nature craft using stick and fall leaves Second Method

Cut leaf shapes out of coloured or printed paper, leaving a long-ish tab at the end.  Dab a bit of glue onto the branch and stick each leaf by wrapping the tab.  This method was inspired by the ‘Fabric Leaf Tree’ found at Two Girls Being Crafty, and simplified for kids.

For method number two, we made our tree come to life by adding a little fold into each leaf.  We also made a fold at the end to create a little tab.  We put glue on the backside of the tab, and wrapped it around the branch:

Folded leaf for nature craft

Kids Nature Crafts with Sticks 2 – Twiggy Container:

We liked the look of the pretty votive holders we found at Fossil, and tried our own kid-friendly version.  This can be used to hold pencils, as a small vase, or for small trinkets.

Decorative can craft with sticks and ribbon

You’ll need – a clean dry empty can (choose a size that suits you; we used an old tomato paste can), some wide masking tape, dry, thin sticks and twigs, ribbon

What to do:

Remove the label from your can, and ensure that it is clean and dry.  Prepare the twigs you want to use by snapping them to approximately the same height as the can (tip: for larger thick twigs, an adult can cut to size with pruning sheers).  Wrap collars of masking tape around your can STICKY SIDE OUT.

Kids Recycling CraftStick the twigs to the tape, covering and open spaces with small bits of twig or other finds from nature (such as dried grasses, dried leaves, etc).  Tip: an adult can help by holding the can while kids press the sticks on.  Wrap a ribbon around your finished can to secure sticks, and tie a bow to complete.

Kids Nature Crafts with Sticks 3 – Stick Person Picture:

The stick person is every child’s favourite way to draw people, so why not do it with real sticks?  Parents or caregivers can help guide this activity by asking what part of the body they should start with, and “what do we need next?”.  An easy way to identify basic body parts as they craft.

Craft Idea with Sticks - Stick person for kids

You’ll need – stiff cardstock or cardboard, construction paper, small sticks, crayons, markers, or pencil crayons, scissors, glue, yarn (optional)

What to do:

Choose some sticks that can be broken easily into smaller pieces for your stick person shapes.  Think about pieces for legs, arms, body, skirts, feet, and heads.  Tip: if your child wants to make perfectly round heads for their characters, have some yarn on hand to replace sticks where necessary.  Start working by laying stick body part out on top of your paper, and then pick up the piece to add a generous amount of glue to the area before putting your stick back in place.  Repeat with the rest of your body parts and let dry.  Colour in a mouth, eyes, and nose.

Read More

Nature Crafts – Craft Ideas with Rhubarb

I have two rhubarb plants in my back yard – one of them was a resident before we moved in, and the other was given to me by a friend.  I’ve ignored the plants for the past couple of years, but this year we have rhubarb in abundance.  Here’s one of our two plants:

Rhubarb For Kids Crafts

I love to eat rhubarb (especially in pies or crumbles!), but the problem is that my family doesn’t share the same sentiment.  Actually I created a little poll on a handy iphone app called Pollate*, and apparently 50% of people don’t like rhubarb – whether its’ baked into something or eaten by itself.  So that got me thinking about creative uses for rhubarb.  Here are a few crafty ideas:

Rhubarb Leaves

This part of the plant can’t be eaten anyway so why not put it to good use.  Rhubarb leaves have beautiful veins throughout, making them a great option for stenciling or stamping.  Try:

1.     Play Dough Patterns – your child can roll or press a piece of play dough or modeling clay so that it is flat.  Press the rhubarb leaf (vein side down) into the playdough.  Gently pull the rhubarb up to reveal your pattern

2.     Rhubarb Paint Stamping – get out your paintbrushes or sponges, and paint your rhubarb leaf (on the veiny side)  Press the painted rhubarb leaf onto your piece of paper.  Repeat with multiple colours to achieve a multi-coloured effect. Tip: use naturally dyed paints, so that you can throw your leaf into the compost bin when you’re done.

Paint Stamping with Rhubarb    Nature Craft - Make a Rhubarb Stamp Art Painting

3.     Rhubarb Leaf Stamped Pottery – if you’re looking for a more involved project and have access to pottery equipment, use a rhubarb leaf as a stamp for a unique plate.  My daughter made the one pictured below when she was 6.  Roll a piece of clay out, press the leaf into the clay, and then cut away excess from the edges.  Shape a handle and dry/fire/glaze

Pottery Idea for Kids - Rhubarb Stamped Plate

4.     Rhubarb Stepping Stones can be made using the directions found here.  We’ve made stepping stones before, with a mix of 1/3 cement, 1/3 peat, 1/3 sand.  We didn’t add chicken wire to our stones and they’ve lasted for quite some time

Rhubarb Stems

This is the part that can be used in baking or for eating, but the stems can also be used to make red dyes for t-shirts, play dough, wool, or colouring eggs.  Simply stew a rhubarb stem with ~4 cups of water and then strain, using the liquid as your dye.  You could also use it for watercolour painting of sorts.

If you do happen to like rhubarb in baking,try this rhubarb chocolate chip loaf recipe.  I’ve tested many rhubarb recipies with my family, and this is the only one that gets an enthusiastic nod from everyone.

*Full Disclosure – the Pollate app for iphone was created by my husband, so I’ve become a bit of a ‘power user’.  Users can make, take, and view polls.  If you want to try it, it’s free to download on itunes or visit the website


Read More

Five Easy Mother’s Day Craft Ideas

1.     Handprint Flower Photo Frame
Trace and cut several handprints from bright construction paper.  Glue in a circle around a clean yogurt or other plastic lid.  Glue a photo of your child in the centre.  Affix magnet strip to the back for hanging

2.     Building Block Model of Mommy & Me
If you have a Lego or other brick building lover, ask them to build models of mommy with them.  Take a picture of the models, print it, and glue to a piece of construction paper or card stock.  Writers can include a note describing their pictures, while non-writers can describe their picture to caregiver, who can write down their words

3.     Painted Flower Pot
You can never go wrong giving flowers, so make it extra special by painting a pot and planting mom’s favourites for her

4.     Make A list, Check it Twice
Make a simple list using pictures or written words, describing the five or ten things you love most about mommy.  You can do this in a list format, or make one drawing & sentence per page and put it into booklet format

5.     Tissue Trinket/Jewelery Holder
Rinse and clean an old tuna can/salmon can thoroughly and remove label.  Cover can with tissue squares using a diluted glue mixture (1:1 glue:water).  Let the decorated can dry.  You can decorate the inside of the can in the same way, or cut a circle of felt that can be glued to the bottom inside. 


Read More